


Monday, September 27, 2010

Moving along

So I rounded up all the materials to fabricate a very bare bones wire drawing bench, it may not be the prettiest thing but it works.  I also finally got all of the hoses, clamps and adapters I needed to hook up and test out the wax injector so there will be some pictures of that latter on as well.  


So here we have the basic parts laid out, the final layout won’t look anything close to this but this is where I started. 
Ok so this is closer to what the end product will be. 
Here is an overall shot of the classy setup in my garage. You can see a few chopped up pieces lying on the ground to the front right. Got a ways to go at this point.  
Ok so here are all the pieces chopped up and ready for welding. (Although that is a lie, I end up having to cut a few more things later to add on some unplanned parts.  
The welder. 
Skipped a few steps in getting here (sorry got excited and forgot to take the pictures) but here is the basic idea so far. 
Here I got the lever added on and the end supports to hold the draw plate/s. 
Here is one of the areas that required additional chopping. I knew I was going to need some type of support down on the bottom so I thought this one up on the fly and it worked out really well. Those little angled feet work really well for stepping on and getting support/leverage when needed and they could also be drilled through so that the machine could be bolted down to the ground, however I haven't felt the need to go that extra mile yet, maybe someday.    
All welded up and painted blue.  
Here she is resting in the studio. She works pretty well don’t really have any complaints except that I wish she wasn't so noisy and it would be nice to have a big wheel on her instead of a lever. One thing I really do love is the length; she is two meters long so I can make some serious lengths of wire.   
I was worried she might be too long but the oversized lever allows me to work the machine easily even when at the far end. There are only a few angles where one can fall out of position with the lever, hence why it might work better with a wheel not a lever.  
All in all once I practiced with her for a while and got into a rhythm, she works like a dream.  
As promised here is the wax injector all fired up and ready to go, fortunately besides figuring out where to get all the hoses and connections there were no problems on this front.    
Here is a shot of the general layout.  
Here are the first few waxes pulled at the studio. I had the choice of this beautiful picture with a really nice flash hot spot or another one that was completely blurred and out of focus so I went with the hot spot. 

Friday, September 24, 2010

Setting things up

Now that all the tools (minus one rolling mill and a few other items) are in my possession it is time to organize and set everything up. I bolted down my vice, wire rolling mill, vulcanizer, wax injector and started sectioning off areas of the tables for wax work, mold making, casting and so on. There are a few special projects that I needed to start working on as well. I needed a stand for my flex shaft a fire proof table to support the kiln, and I also needed to fabricate some type of wire drawing bench. So I went out bought some supplies and busted out the arc welder. Here are some of the advancements at the time. 
 So here is the jeweler’s desk with the flex shaft stand installed, I also added a shelf against the wall behind the desk for more space and mounted a couple of magnetic and nonmagnetic racks on the side wall next to the desk. 

Here is the kiln on its brand new home made stand. 

Thursday, September 23, 2010

More new toys

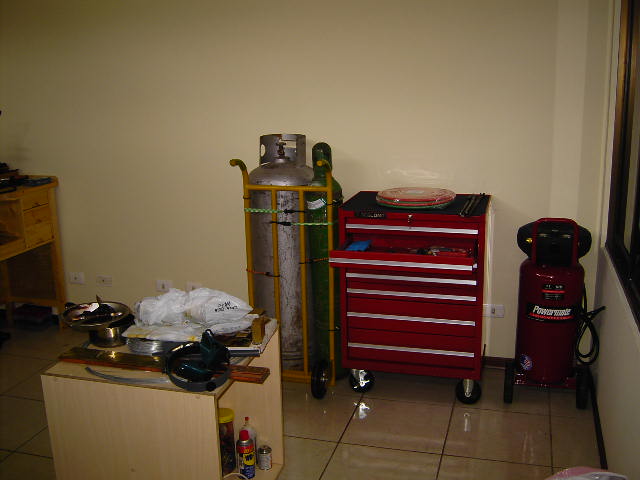
Went out to buy a few more new toys a few days after the boxes showed up. Got a new shinny bright red tool chest, a dolly to strap the gas tanks down and an air compressor to power the wax injector and any future pneumatic tools. Also did a bit more unpacking and organizing but we can get into that in the pictures. 
Here they are the newest additions.


Scanning across the studio to the left you can see a few things have been moved around. 


Here you can see the wax injector and the mess that is the studio at the time. 


If I remember correctly I finally committed to bolting down some of the bigger pieces of equipment and that’s what this picture is all about. The wire rolling mill (bright blue front left) is pretty much in position if not already bolted down, and the vulcanizer (dark blue back right) is also essentially in its official resting place.  
Here are the meager beginnings of what will become my casting/ soldering/ annealing station.  
A few fun toys, regulator, scales, ingot mold, mandrels, draw plates, punches, daps, and design blocks. More still to come. 


And time goes on


So time went on and we continued to organize and decorate, some friends got married and I had the honor of making their wedding rings and a bunch of unexciting errands and mundane things went on besides that.  It was either in late July or early August, either way the imported tools finally arrived in Costa Rica, made their way through customs and to my door. Talk about an early Christmas, it was an awesome time opening up all the boxes and crates and trying to guess what was inside each one. It was a real relief to have everything arrive in good shape I was a little nervous of having things transported through the Gulf Coast with the whole BP oil spill going on but I guess the boat made it through ok.  Let’s move on to the picture and less depressing topics of conversation.   

Ok so here are the boxes going across the room to the right this is looking in from the door.


The corner to the right.


And the opposite corner 


Opening up some of the boxes, here is the wire rolling mill very cool. :o)


These boxes hold the pieces that will be the jeweler’s desk.  
Here is an overall shot from the door of all the stuff stacked up on the tables and the jeweler’s desk built in the corner.  
Ok scanning across the room from right to left: investment boxes, jeweler’s desk, tool boxes, digital kiln and vacuum caster.  
Slightly more to the left we have a better angle of the same. 
Here you can see the vulcanizer, rolling mill, ultrasonic cleaner and maybe a few other goodies if you have sharp eyes there is allot of stuff I still have to sort through at this point. 
And even more things over one this side. One can never have enough tools. 

Time to make something

So step one while I wait for all the tools to come in from the USA is making some solid work tables. I went over to the local hardware stores for a few things that could be found cheaper there than at the Costa Rican “Home Depot” equivalent which is called EPA (no affiliation to the “Environmental Protection Agency” I assure you) and that’s where I got the lumber for the tables. It took me forever to decide on the dimensions of these bad boys but if anybody is interested I settled on 8ft X 2ft X 3ft. There is a slight over hang (about an inch) on the front of the tables and off the ends so that bench pins and clamps can be secured to the edges when and if need be. Along with building the tables I am also working on getting the propane and oxygen tanks I will need to well you know make fire… very important. And on to the pictures (I feel like it makes the flow work better, and I like pictures).

Cut, cut, cut... 


Many cuts later.


And even more cuts later. Here are all the bars required for the frames and legs (the plywood tops and plywood for shelves are off to the right against a wall, sorry no pictures of those).  
Some of the wood had a bit of fungus growing on it so I decided to treat it with a wood fungicide before staining and assembling the pieces. Here I am treating the affected wood.  
So I got a bit ahead of myself (as will happen) and I started assembling the tables and totally blanked on the pictures but here is one down and one on the way (along with an adopted furry friend I am sure Samson will be making future appearances from time to time). I have better pictures of this stage but there will be plenty of table pictures ahead so on we go.  
Here is my good buddy Chiri helping me out gluing and screwing the frames into place along with the legs and everything else (thank you Chiri you helped a lot and I really appreciate it). 


Night time shot to spice things up a bit. After building the top frame we attach the legs then flip it over right side up and place the shelf frame into place then the top gets screwed on in case anybody was curious. 


The next morning everything finally came together. The only thing missing now is to seal the tables and move them inside.  


Here I am. Finally got the first table inside with Kaylee's help and I got to start putting things on it just too clear up the floor space to get the other table inside (what a mess). 


Here are the two tables finally inside piled high with all sorts of good stuff and so much more to come its ridiculous. 


Another angle this is nowhere near what it looks like today but it was a nice start so much better than the floor, although I'm still trying to figure out what to do with the table saw, chop saw and band saw they are kind of an eye sore sitting out in the living room. So the table on the right is directly opposite the wall with the door and window, the filing cabinet is directly in front of the door. I have no idea if that helps anyone but oh well I tried and hopefully it will become clearer in the future.  
Oh yeah figured I would throw this in here too. Finally got my gas tanks starting to get pretty excited (propane on the left and oxygen on the right for anyone who might not be able to tell).